This document covers the regular use and maintenance of the BenchBot Version 3.0 in the semi-field image acquisition application.
| Info |
|---|
This manual is a work in progress. Procedures and warnings may change or be updated. |
| Note |
|---|
Read the entire manual. |
Table of Contents:
| Table of Contents | ||||||||||||||||||||
|---|---|---|---|---|---|---|---|---|---|---|---|---|---|---|---|---|---|---|---|---|
|
Overview
This is a high-level overview of what the BenchBot is and does from an operator's point of view.
What does it do?
It automatically moves and takes images of species to collect data.
Where does it do it?
Basic Traits / Specs:
Top-heavy. Slow Y-axis movement is necessary to not potentially tip over the BenchBot.
Axes of motion:
X-axis movement: the carriage moves across the BenchBot. Controlled by the BenchBot App.
Y-plane movement: forward, backward, left, and right movement controlled by the Amiga or the BenchBot App.
Z-axis movement: the Z-axis components move up and down. Controlled by the BenchBot App.
Block diagram:
General description of the function of the major components:
Amiga Dashboard: Smaller screen that allows for Y-plane speed settings (default speed is way too high) and to turn auto-control on and off. Other settings are also on-screen but do not generally need changes.
Amiga Pendant: This remote allows user to control Y-plane movement manually if auto-control is off.
Amiga Brain: This is where the BenchBot App is available for use. Includes manual controls for the X, Y, and Z axes. Also allows for setup of the BenchBot to be run automatically.
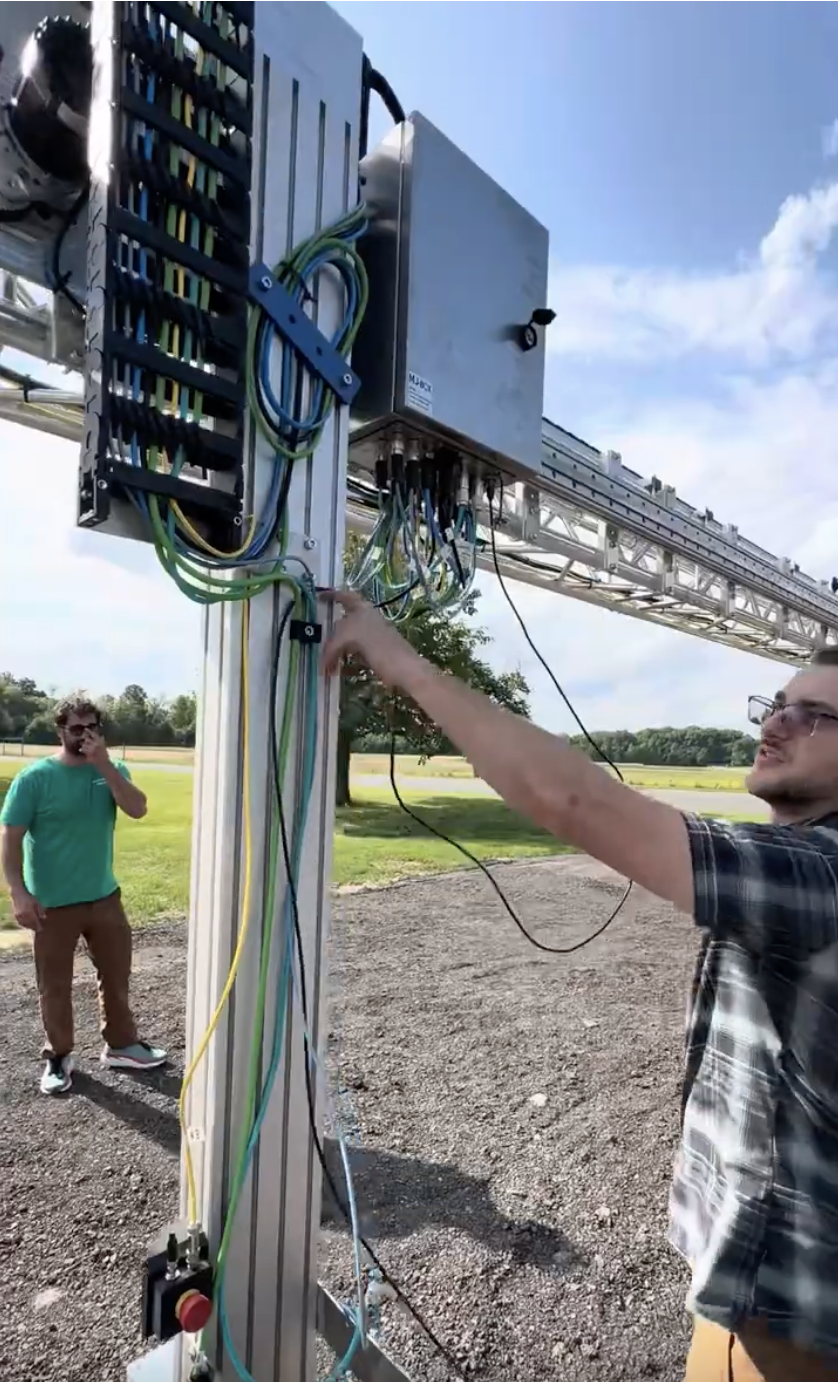
Electrical Box: Part of the carriage. Can find components including the Mini PC, network switch, ClearCore, etc. on the inside of the box. Wires are seen coming out of the box and the box should normally be locked.
Emergency Stops AKA E-Stops: These red buttons stop movement in X, Y, and Z axes when they are pushed in. Twisting the E-Stop after they are pushed in will pop the E-Stop out again.
How waterproof is the BenchBot?
It is completely waterproof minus the Sony camera/flash (and camera USB 3 cable) and the batteries. Although the batteries are fairly water resistant. That being said, it is slightly better to not have the high pressure water (from the sprinklers) spraying directly on the BB more often than every now and then.
Safety and Warnings [Updated Frequently]
| Note |
|---|
This is a large powerful machine, every motor / axis is capable of applying enough force to seriously injure a human. Only trained personnel should be in the vicinity of the robot while it is powered. |
| Note |
|---|
TIPPING RISK. ALWAYS SET AMIGA SPEED TO 3-4 BARS using the Amiga dashboard. Do not move the BenchBot manually or automatically, or test E-Stops at higher speeds. The default setting is extremely fast and can likely cause the BenchBot to fall over and cause injury or death. |
| Note |
|---|
Be aware of your surroundings and the terrain when operating the BenchBot. |
| Warning |
|---|
[NCSU ONLY] ONLY THE CARRIAGE MOUNTED (MIDDLE) E-STOP IS OPERATING FULLY
This is a hard E-Stop to reach, especially during traversal as the Z-Axis is set to the highest point currently for imaging. This is a current error as of 7/10/2024. |
| Warning |
|---|
BenchBot App E-STOP NOT WORKING: The E-Stop on the “Manual Control” tab on the BenchBot App does not function properly. This is a current error as of 7/2/2024. |
| Note |
|---|
Battery Fire Hazard: Farm-NG notified us of a battery fire. As of 7/29/24, here are some of their steps to mitigate risk/further damage if a battery does catch on fire.
This is a current error as of 7/29/2024. |
| Info |
|---|
PAUSE ERROR: Pausing can cause the Brain to lose tracking of the camera and all axes of the BenchBot to stop moving. Restarting the BenchBot app on the Brain may restart the axes motion, but it will not recover accurate tracking of the camera. Please avoid pausing the BenchBot if possible until resolved. |
| Info |
|---|
Ticks: Check for ticks as we noticed them on the NCSU plot. |
General Daily Procedure to Run BenchBot for Imaging:
| Info |
|---|
Each step has detailed instructions provided in the hyperlink. |
Review Safety and Warnings (Link to section: Safety and Warnings) as it may be updated.
Check Slack and other forms of communication as well if the team makes announcements or warnings about the BenchBot.
Perform maintenance according to schedule. Link to section: Maintenance
Remove overlapping plants for data collection. Link to section: Removing Overlapping Plants for Data Collection
Hardware setup. Link to section: Hardware Setup
BenchBot V3 Step by Step Operation for Image Acquisition. Link to section: Step by Step Operation for Image Acquisition
End of day tasks detailed in both:
Hardware setup. Link to section: Hardware Setup
BenchBot V3 Step by Step Operation for Image Acquisition. Link to section: Step by Step Operation for Image Acquisition
Maintenance
Maintenance schedule followed by description of tasks.
Daily
Inspect…Inspect:
Quick look-over of the BenchBot:
no obvious damages or changes to: general structure, tires, cables, box, etc.
need to include more…
Test Every E-Stop Switch (AFTER setting Amiga Dashboard speed to 3-4 bars.)
Weekly
Inspect…Inspect:
Tarp / terrain the BenchBot will traverse over.
need to include more…
Grease X-Axis Pinion (coat it to where there are no gaps, but not to the point where it is dripping)
Grease X-Axis Rollers
Grease Z-Axis Rollers
Grease Z-Axis Leadscrew
Monthly
Inspect….
Seasonally (~ 3 months)
Inspect….
Hardware Setup
What needs to be done before the system can be powered on and used.
Battery Charging
Read the warnings and be aware of any hazards.
Make sure the battery is dry, then, using the correct adapter and plug, charge the battery.
You can tell if a battery is fully charged by the green light on the adapter. If it is charging, it will be red. If the plug is not plugged into a battery, the adapter light will also be green.
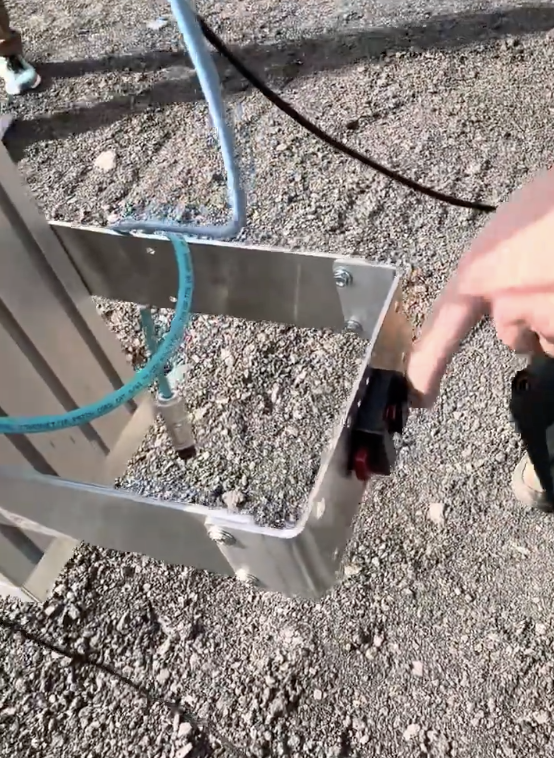
Battery Installation / Removal
To Install Batteries:
Take 4 Amiga batteries and 4 battery keys to the BenchBot.
Make sure the battery is set to “UNLOCK” or “LOCK” using the key (some batteries have different icons and setting names). This setting should make the rod on the battery be as short as possible, allowing you to slide the battery into the slot while the battery is also off.
If the battery is in another position, to get past the 2nd marking on the battery (sometimes labeled “PUSH,” you’ll need to slightly push in the key in order to turn the key left or right.
If the battery key is in, take it out.
In the area above each wheel, there will be a slot to slide each battery into. Orient the battery so that the rod on the battery will fit into the hole in the slot when it is extended later on.
Slide the battery in. The grooves should fit the slot on both sides so that it is in place.
Make sure the plug is not wet, and plug it into the battery.
Insert the key into the battery and turn the battery into the “ON” position. On some batteries, this is a red icon that is the furthest setting away from “LOCK” or “UNLOCK”. This will both turn the battery on, while also locking the rod outward to secure the battery in the slot.
Leave the battery key inside to run the BenchBot. This is similar to turning a car on. The key needs to stay in.
To Remove Batteries:
Turn the battery key to “LOCK” or “UNLOCK” so the battery is off and the rod on the battery is shortened.
Take out the key.
Unplug the plug.
Slide out the battery.
On one specific NCSU BenchBot slot, this is difficult. You may have to shake the battery side to side while pulling outward to get it loose. Try not to shake the BenchBot too much as the bot is top heavy.
To leave batteries in briefly while powering down:
Turn the battery key to “OFF”. On some batteries this is a white/grey icon that is next to the “ON” or red icon.
This will turn off the battery, while keeping it locked in via the rod in the slot.
Take the keys with you so nobody can steal the batteries.
| Info |
|---|
Don’t leave them out for long if you are unsure of the weather or if you can’t get back quickly to take them inside if it begins to storm. |
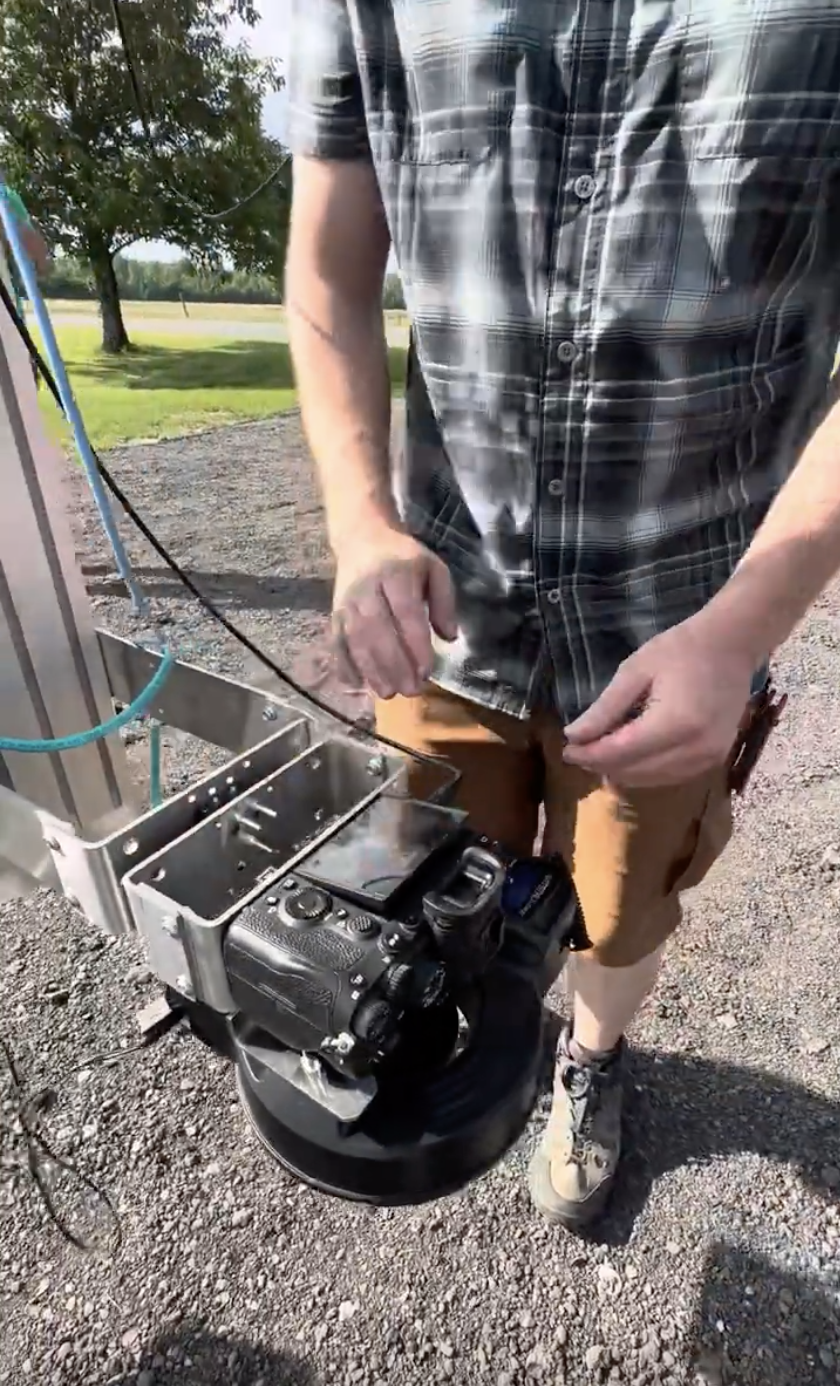
Sony Camera (& Flash Device) Installation / Removal
| Note |
|---|
WARNING: Don’t damage your eyes with the flash device. The flash from the flash device is very powerful so do not look directly into it when testing the flash device or running the bot. Make sure other people are not looking or in the way of the flash. |
| Note |
|---|
Also, the flash device gets hot. |
Video Link (video contains supplementary info, also read the manual for details): https://youtube.com/watch?v=Q6woepaJYKM&si=OwiEP2KcKKMvgq17
Make sure irrigation is turned off even if irrigation is not scheduled to run.
Reason: the camera and flash device will not survive the sprinklers.
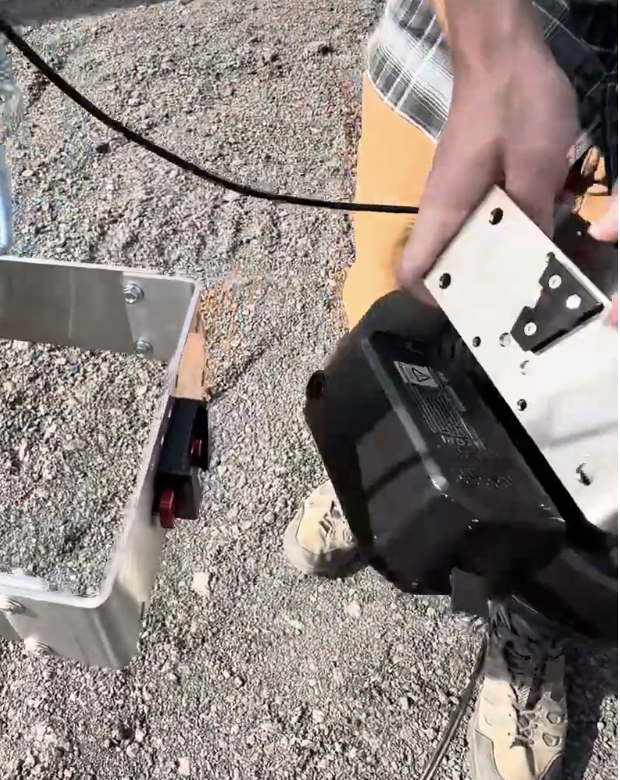
To attach the camera mount to the mounting bracket, place the V-shape piece (of the camera mount) in position to fit with the mounting bracket (on the bot) and slide it down. It will lock in place very tightly.
Check that the camera is straight in the mounting bracket and not tilted.
If it is tilted, during imaging the Amiga may be in frame which is not the end of the world, but is generally not desirable.
If the camera is moving around a lot and is loose, tighten it via the mounting screw adapter.
When placing the camera in, before placing shade on or anything on top, you must tilt the SONY screen upwards a bit (as shown below) or else the camera will not take pictures.
Plug the USB-C end of the black USB cable (must be USB 3 and approximately 10 ft. long) into the camera. Then route the USB cable as shown below, being supported lightly.
Screw off the protective cap on the USB port of the box & plug the USB-A end of the cable into the box.
Plug the black connector into the flash device.
Make sure:
The 2 cables will not strain too hard or pull on anything too hard as you adjust the Z-axis. You can test this by adjusting the Z-axis in small increments during the testing portion of the BenchBot operations detailed in this manual.
The cables will not get caught in any gears or moving parts.
The cables do not interfere with the images.
Get camera ready for photos
If needed, complete camera settings (Section: SONY CAMERA SETTINGS for SEMI FIELD).
Otherwise, power on the camera and the flash.
Check that flash screen displays “1/1”.
Check that the settings on camera screen are correct:
As of 7/31/24, the camera settings to quickly check are on screen are:
Top left corner: “M”
From bottom left to bottom right: “1/200 F11 ISO100”
Put sunshade on to keep the camera cool and dry if it drizzles a bit.
When finished for the day:
Take off sunshade (cardboard with metal tape).
Unplug the black USB cable attached to the SONY Camera.
Unroute the USB cable.
When unplugging the USB port, you MUST screw the cap back on all the way to prevent bugs from getting in. If damaged, the port will need to be replaced and will take a week.
Unplug the black flash power connector.
This cable can be left uncovered.
Place a small finger between the mounting bracket and camera mount and press down on the red button. Then, while pressing down, pull up on the camera mount and it will detach.
Take the camera USB cable inside as it is not waterproof and will rust. Take in the camera and sunshade.
Make sure to complete other “end of day” tasks such as the ones detailed in BBV3 Step by Step Operation for Image Acquisition.
Amiga General Usage
This section will include instructions specific to the Farm-ng Amiga robot, which the BBv3.0 uses for Y axis travel. This section will not apply to version BBv3.1.
| Warning |
|---|
You MUST set the speed to 3-4 bars (on the 1st tab of the left sidebar) BEFORE controlling the Amiga using the Pendant. This applies to any Amiga movement. If not, you risk tipping over a large machine and causing injury or death to people in the vicinity. Then, test E-Stops are working as well before moving the Amiga. |
The Amiga Pendant is a remote that can be used to move the Amiga manually.
If auto-control is off, the BenchBot can be moved via the joystick on top of the Amiga Pendant.
Amiga Dashboard Overview

.


BB App User Interface Overview
Screenshots of each page in the app and a brief description of each function.


Pressing “+X” will move the X-axis your specified amount. The values start from 0. To go in the negative direction, you would press -X. Same thing for Y and Z.
“Take Image” lets the user take an image. An image will appear, or an error will show.
Not working: “Emergency Stop”
Not tested: “Home X and Home Z”
Not tested: “To this position” - I believe if there are multiple values on screen, such as 10cm for X, 20 cm for Y, and 30 cm for Z, pressing this button will move in the positive direction of all of those axes, at the same time. I may be wrong.
Not tested: “Pause”

This tab is generally skipped during operation.

Operation is detailed in the Step by Step Operation section.

Operation is detailed in the Step by Step Operation section.
BenchBot V3 Step by Step Operation for Image Acquisition
Using the BenchBot v3 for image acquisition.
| Note |
|---|
** Read the entire procedure before operating for the first time. Do not follow step-by-step without reading beforehand. ** |
[Additional video that covers some, but not all of the operation procedures. Some steps may be out of order in the video as well: https://www.youtube.com/watch?v=CH80054G9l0]
| Info |
|---|
Be aware of your surroundings and of the terrain the BenchBot will traverse on. |
| Info |
|---|
Before moving anything, make sure you have enough room to safely operate, so that even if you accidentally move the BenchBot in the wrong direction or if you press the movement buttons a few too many times, it will not go off course or hit something. |
| Note |
|---|
If any E-Stops are not working, be sure to alert others who may be in the vicinity during operation. And those who may use/work on the BenchBot in the future. |
Starting BenchBot Operation:
On the Dashboard, click start.
On the 1st tab on the left sidebar: Set speed limit to 3 or 4 bars.
MUST KEEP IT LOW or else the bot MAY FALL OVER. THE DEFAULT SETTING IS TOO HIGH.
Do two preliminary E-Stop tests.
Test that E-Stops are preventing Pendant-controlled movement from beginning:
Press in an E-Stop.
Do not press two E-Stops in at once. We are testing each one to make sure it works individually.
Attempt to move the BenchBot forward or backwards by moving the joystick the Pendant. The BenchBot should NOT move.
Make sure it is a direction where you have room, in case anything goes wrong.
Stop moving the joystick.
If this test fails, that E-Stop is faulty and this issue should be resolved.
If this test passes, clear that E-Stop and repeat the test for other E-Stops.
Test that E-Stops are preventing Pendant-controlled movement that has already begun:
Using the pendant, move the BenchBot in a direction where you have room.
As you are moving it, have someone press in an E-Stop. The BenchBot should stop.
Clear the E-Stop and repeat the test for other E-Stops.
On the Amiga dashboard, click on the 3rd tab on the left sidebar. Turn on auto-control.
The icon will turn from gray to orange/yellow. Now the Amiga is ready to be controlled by the BenchBot App on the BenchBot Brain.
Auto-control may reset each time an E-Stop is used.
On the Brain, click on BenchBot App on the Apps screen.
Start on the 1st tab: Manual Control tab.
We will check for 5 things to be working properly (X axis, Y axis, Z axis, image capture, and the Emergency Stops (E-Stops)).
Test the app-controlled X-axis movement a small amount: add 10cm, then click +X (positive X). Then click -X to check the negative direction.
Note: Getting very close to the end sensor may cause problems, so you may want to move it a few centimeters away.
Now test each E-Stop for the X-axis.
Move the X-axis a decent distance like 50cm.
Press in an E-Stop as it moves. It should stop.
It should stop because of the E-Stop, not due to an error that has been found where sometimes Z-axis movement will stop short of the specified distance, or because you did not press the E-Stop in-time.
Then clear the E-Stop and repeat the test on each E-Stop.
Test the app-controlled Y-axis movement. Do a small amount like 20-30cm. Too small of a Y-axis movement will not work well. Check both directions.
Now test each E-Stop for the Y-axis.
Move the Y-axis a decent distance like 50cm.
Press in an E-Stop as it moves. It should stop.
Then clear the E-Stop and repeat the test on each E-Stop.
Test the app-controlled Z-axis movement as well at a small amount like 5cm or 10cm. Check both directions.
Now test each E-Stop for the Z-axis.
Move the Z-axis a decent distance like 50cm
Press in an E-Stop as it moves. It should stop.
Then clear the E-Stop and repeat the test on each E-Stop.
Finally done testing E-Stops. Now we know that Amiga Pendant-controlled movement (any direction in the Y-plane) and BenchBot App-controlled movement (X, Y, and Z axis) are stopped by each E-Stop individually.
Check the camera by clicking “Take Image.” The flash should go off and the image should appear on screen in a few seconds.
Check that the image exposure looks correct.
Make sure the X-axis, Y-axis and Z-axis are in correct locations as well before beginning.
Bring a measuring tape if needed.
Linked is where you can find X-axis offset settings for your site: BB V3 Site Configurations
Y-axis is generally set to start on the first row of pots to image. Sometimes, you may continue a run where it was left off the day before.
Z-axis is generally set to 1.8m from camera lens to dirt (in the pot) for NCSU.
Skip over the 2nd tab.
Go to the 3rd tab “Species Map”
Adding more rows of species will add them on top of the previous rows. So plan accordingly by adding rows that are closest first and move further out.
You can also add empty rows (use the “none” selection for species).
Set pots per row, row spacing (Y-Axis), pot spacing (X-axis) and other settings.
As of 8/6/24, at NCSU, we are simply setting the entire map to be one species, even though there are 7 species groups.
Confluence page for settings: BB V3 Site Configurations
Click add species and the map will update.
On the map, you can make some individual changes to pots.
UNDO only works for entire rows, not individual pot actions.
Verify everything by swiping and checking the screen.
Click save to save map. “Species map saved!” will appear on screen.
Go to 4th tab “Traversal”
The map is shown in its final version on the right. It is uneditable on this screen.
STARTING TRAVERSAL:
Before starting, confirm there are no errors on the dashboard, that auto control is ready, and the speed is still 3-4 bars.
Click Start on the traversal tab.
Text logs will begin appearing. Images will show as they are taken on the bottom. If there are errors, it will show on the map. Successful images will appear as “Visited” on the map.
Watch and listen to make sure the bot is operating normally as it moves across the X-axis and traverses for the first time in the Y-axis.
DURING TRAVERSAL:
Make sure to check the bot every few minutes. Setting a timer may help. You may need to make sure the bot is not going off-course (to the left, right, or too far forward when the bot is almost complete with the run for the day) or that there are no errors.
Check that the camera is taking photos (it will appear on screen) and flash is working.
When capturing images the user should inspect a test image collected at the time of image acquisition, and make change to the aperture F10-F13 to make sure we get an appropriate exposure.
The image should also be inspected to make sure that autofocus and the flash is working as intended.
PAUSING:
The bot will finish taking its last action before pausing.
To confirm the bot is paused, after clicking pause, the log will show “Traversal paused” and the corner will show it is paused.
Clicking start after pause will start from where it left off.
STOPPING:
Stop will take some time like the pause button to finish the last action.
LEFT AND RIGHT NUDGES:
Left and right will provide small directional correction when the BenchBot is a bit off.
It will only take effect when the Y-axis is moving next. You can confirm that the left nudge was registered by looking at the logs.
No matter how many times you click, it will only nudge a single time.
If accidentally clicked left instead of right, just click right and it will move to the right (it acts according to the last selection).
However, if left or right is clicked, it cannot be deselected. The bot will nudge.
EXITING:
Click exit to launcher.
| Info |
|---|
Tip: During manual control in the BenchBot App: If a movement on a specific axis was set to too high of a distance, and let’s say the bot is moving too far in the Negative Y-axis to the point where it may hit something: another way to stop it (besides an E-Stop) is to just click the opposite direction of that axis (for instance, 50cm in Positive Y if the bot is moving too far in the Negative Y direction). As of 7/18/24 for the NCSU BenchBot, this will stop the movement in the current direction, and go the newly specified distance in the other direction. |
To pause BenchBot for a short amount of time:
Click “Pause” on Traversal screen.
Press in an E-Stop.
Have somebody trustworthy watch the bot.
To restart in the middle of a run after stopping and exiting (not the same as pausing):
Stop soon after a photo is taken on the right-most side of a row. Please try to not stop in the middle of a row. This is to limit duplicate images as the BenchBot will only restart after stopping/exiting on the right-hand side.
Leave the Y-Axis as it is.
When you come back, move the X-Axis to begin taking photos from the right-hand side. Match the starting X-Axis value from the beginning of the run so photos are all aligned correctly.
Check other startup procedures (dashboard (speed and auto-control), species map, etc.).
If the “Traversal” tab is not cleared already (check this by scrolling and checking the entire map on the “Traversal” tab), you can press “Reset” to have a clean map to start with.
Start the BenchBot.
To stop and exit the BenchBot for the day.
Click “Stop” on Traversal screen.
Click “Exit to launcher” on Traversal screen.
Turn off Auto-Control on dashboard.
Make sure the speed is low and move the BB to a good place.
Press in a physical E-Stop.
Turn batteries to LOCK and take them out.
Return batteries, battery keys, cover USB port on box, and remember to take the camera and other equipment as detailed other sections (such as hardware setup).
Make sure irrigation is back on if it needs to run.
How to Stop the BenchBot in Case of Emergency
If it is safe to do so, press in an E-Stop that is functional (as of 7/2 for NCSU, this is only the carriage-mounted E-Stop (the one moving across the middle of the BenchBot)).
If the BenchBot is moving quickly and it is safe to do so:
Hold and pull the remote control in the opposite direction of the BenchBot.
If this snaps the coil, this should trigger an emergency stop.
If it is safe to do so, turn off all the batteries.
Warn bystanders.
Quickly Turning Off the BenchBot and Bringing Equipment Indoors
| Info |
|---|
For instance, if it is about to rain heavily. |
Stop the BenchBot traversal using the BenchBot App. Wait for it to stop.
If there’s ample time, move the BenchBot halfway between sprinklers or to the spot it usually rests at so it doesn’t block irrigation. Otherwise, skip this step.
Get the non-waterproof equipment (you may have to move the Z-axis down using the Manual Control tab in the BenchBot App).
Camera USB cable, SONY Camera & Flash.
Screw back in the cover for the Sony Camera USB Cable on the box.
The batteries and keys. This will power off the BenchBot.
Turn on irrigation.
Close the fence (at NCSU).
Removing Overlapping Plants for Data Collection
| Info |
|---|
This is to help with the imaging process. |
In single pots, if there are two independent things sprouting, if they begin to overlap, take one of them out.
If this spreads across pots, where growth is getting to the point of one pot's plant overlapping with a second pot's plant, then remove one of the overlapping plants so that pot is empty.
At some point, you may need to arrange the pots so that every other pot is an empty pot.
If there are any weeds that are not a part of the species, that will need to be pulled.
Other green things such as random leaves need to be removed as well, as not to mess with the data collected.
Debugging Issues
BenchBot App Not Loading
There may be an issue with the app service not stopping correctly when the user clicks “Exit” in the BenchBot App. The fixes for this include either:
Before powering down, stop BenchBot App service manually by contacting your software team. Then, the next time the BenchBot is powered on, the BenchBot App will launch when clicked on.
Or, if the BenchBot is already on, have the BenchBot App service manually reset by contacting your software team. Then, when you click on the BenchBot App, it should launch.
Camera Issues:
These are methods we have found so far to help debug the SONY a7Riv camera.
If there is an error message showing on the Amiga Brain that “JPEG RAW is MISSING” or something similar, this means that the Brain is connecting to the mini-computer. So we can move onto the next step.
Now, check that the mini-computer and the camera are connected. If the USB is plugged into the camera and the box, then there should be a “-PC-” showing up on the camera screen.
If “-PC-” is not showing up on the camera screen:
Try a different USB cable.
Open the box and instead of plugging the USB cable to the port on the box, plug it directly into the USB port onto the mini-computer.
If “-PC-” is showing up on the camera, and the Brain is connected to the computer, listen for two sounds: 1) the camera is focusing and will beep & 2) the camera will shutter to take a photo.
If the camera is focusing, but there is no shutter, this is likely a focusing issue or a memory card issue.
Try to adjust the focus by pressing but not fully clicking the “take photo” button on the camera to manually help the focus. This may make the camera start working again.
If the memory card is full, even if you are saving only to PC, the camera may not take photos. Delete a few photos to allow for some memory card space.
SONY Camera Settings for Semi Field
| Info |
|---|
This is only necessary to read if you are setting up the SONY camera. Ideally, this is a one-time operation. |
| Info |
|---|
Note: These camera settings for the NCSU - Sony alpha7RIV (soon to be replaced with a new camera) are saved as CAMSET02 with update date of: JUN-25-2024. Double check to make sure the settings are all correct. |
FOR FIRST TIME SETTING UP CAMERA:
Perform a settings reset.
Click MENU button.
Go to Tab 5 (tabs are on top), Page 7.
Click “Setting Reset” then “Camera Settings Reset”. NOT “Initialize” which will delete data.
Switch the camera to Manual (M) mode using the largest wheel on top of the camera. There is a middle button to click in before the wheel will turn. It is labeled “M”.
Set shutter speed by rotating the unmarked wheel on top of the camera that changes the on-screen number on the bottom left corner.
Change this to 1/200 sec.
To change Aperture, we will need to go to “A” mode. Switch the camera to “A” using the largest wheel on top of the camera (click the middle button to allow the wheel to rotate).
Rotate the unmarked wheel on top of the camera to change Aperture to F11.
Return to Manual “M” mode and the aperture setting should be the same as you set it in “A” mode.
Now for the MENU settings.
Click the MENU button.
Change the listed settings to match below. Some settings may already be correct.
Also, some settings may require you to click in, and then change multiple settings within that setting.
Menu tab 1 page 1/15:
File format: RAW & JPEG
Raw file type: Uncompressed
JPEG quality: extra fine
jpeg image size: L: 60M
Aspect ratio: 3:2
APS-C: Off
Menu tab 1 page 2/15:
High ISO NR: Off
Menu tab 1 page 3/15:
Drive mode: Single Shooting
Pixel shift multi shoot: Off
Menu tab 1 page 4/15:
Select Media: Choose according to the SD-card slot you are using.
Menu tab 1 page 5/15:
Focus mode: Single-shot AF
Priority Set in AF-S: AF
Focus Area: Wide
Menu tab 1 page 6/15:
AF Illuminator: Auto
Aperture Drive in AF: Focus Priority
AF w/ Shutter: On
Menu tab 1 page 9/15:
ISO Settings: ISO: 100
Menu tab 1 page 11/15:
Flash mode: Fill-flash
Menu tab 1 page 12/15:
White Balance: Auto
DRO: On - Level 2
HOW TO: it will most likely default to DRO-AUTO when selecting either “OFF” or “ON”. Once you are on DRO-AUTO, click to the right or left and it will give you the different DRO-Level settings.
Menu tab 2 page 5/11:
Silent Shooting: Off
Release w/o Lens: Disable
Release w/o Card: Disable
Menu tab 3 page 1/3:
PC Remote Function: On
PC Remote Cnct Method. USB
Still Img Save Destination: PC Only
PC + CameraRaw+J PC Save Img: Raw & JPEG
PC Save Image Size: Original
Menu tab 5 page 4/7:
USB LUN Setting: Multi
USB Power Supply: On
Date/Time: Make sure to set current date and time
Menu tab 5 page 6/7:
File/folder Settings: Set filename according to protocol
For instance, at NCSU, set the filename to something meaningful like “NCX” rather than “DSC” so the files can be distinguishable.
Press but do not fully click on the “take photo” button on top (the button between the ON/OFF slider) to view if some settings are correct on screen.
You will see ISO at 100. Shutter speed at 1/200 sec. Aperture at F11.
Also, make sure that high speed synchronization is not on.
To do so, put your hand or something in front of the camera and make it dark.
Then press and hold but do not fully click the “take photo” button to see if it gives a “flash” icon ready, or if it says HSS (high speed synchronization).
Given these settings, HSS should be automatically off and there is no way to manually turn that on or off based on limited research.
Once it's setup, you can save the camera settings in the Tab 5, 7th page for easier setup, in case the camera needs to be setup again.
NOT ON CAMERA: Set the separate flash (the big ring that is separate from the camera) to full power at 1/1.